Showing posts with label Shaker. Show all posts

Monday, December 26, 2016

Classy Cards Happy New Year!


Hello, it's Jenny here today on the blog with you.  I hope you are all enjoying the holidays with family and new crafting goodies.  I've been making more step cards lately and thought with the upcoming New Year it was the perfect time to share this one with you.


The base of the card is a black step card made with the Step Card #3 die.  I cut rectangles out of white and blue-green patterned card stock to brighten up the card.  The Champagne Bottle is one of the fun new shaker dies.  I can't seem to get enough of these, they make creating shakers a breeze.  The Mini Happy New Year and Mini Champagne Bottles inside are also some of the new accessories that come in the shaker kits.


I cut the Champagne Bottle Shaker and the Happy New Year die out of silver glitter paper.  It is so sparkly in person but the photos unfortunately don't do it justice.  The Happy New Year die was matted on a piece of white paper cut with the Rectangle Scalloped A2 Set and then backed with another rectangle of card stock colored with distress ink to match the flutes from the Celebration Die.

Dies & Shakers

Thanks for stopping by the blog today and best wishes for a Happy and Healthy New Year!

Sunday, November 6, 2016

Cheery Lynn Cool Dude Shaker


Hello!  I'm sharing a masculine clean and simple style card using the new Cheery Lynn Shaker Dies.  I used the Star Shaker for this card and the Pierced Star dies.  The points on the pierced stars are less rounded but the neon green color unites them visually.


The shaker pieces inside are from the Mini Happy Birthday and Mini Confetti sets.  They work really well together. The Confetti shakers are made up of circles, squiggles, squares and triangle shapes.  I couldn't find my beads (it's always when I need something I can't seem to find it!) but along with the confetti and Happy Birthday I would have also liked to incorporate some beads into the shaker.  

These shakers are so simple to create with the layered dies and they really create an extra wow factor on a project.  My kids just LOVE them.   

Cheery Lynn Dies

Thanks for looking and remember to join in the latest Thank You Challenge at Cheery Lynn Designs for a chance to win a $20 gift certificate!

Tuesday, November 1, 2016

Cheery Lynn November Release Blog Hop - Shaker Collection!


Hi crafty peeps!  Welcome to the Cheery Lynn Designs November Shaker Blog Hop!   I am so excited to show you one of Cheery Lynn's fun and versatile new Shaker Dies.  Check out my teammates blogs along the hop so you can see more in action!  If you arrived from Debbie's blog you are on the right track.  If not, you can head back to the main blog HERE to start from the beginning.  Make sure to stop back at the Cheery Lynn Designs Blog and comment there for a chance to win a $20 gift certificate. 


For this card I created the shaker first using this tuturial .  I've made shakers before but having the dies to cut a perfect foam backing makes this so neat and easy.  I've never seen anything like the shaker pieces either.  They are so cool!  They are a shiny thin metal and they are tiny (perfect for shakers) but they have so much detail.  I used both the Shaker Mini Happy Birthday and the Shaker Mini Confetti die that came in the kit.  I have enough left over for at least one more shaker, if not two.


I used an A2 card, cut a piece of patterned paper using the A2 Frames Rectangular Scalloped set, and then built the card from there.  I layered the You Are Awesome sentiment four times.  I needed contrast between the patterned papers and layering it also added another dimensional element to the card.  To finish the card I added som yellow glitter glue to the candle flames.

Cheery Lynn Dies
Birthday Cake Shaker Card Kit K104K
A2 Frames Rectangular Scalloped CM6
Whimsical You Are Awesome B806

Thanks so much for joining me here on the hop!  Your next stop is Amy's Blog.  Don't forget to leave a comment on the main Cheery Lynn Designs Blog for a chance to win $20 towards Cheery Lynn Designs goodies!

Friday, October 21, 2016

Cheery Lynn Christmas Shaker

Hello!  It's Jenny here today sharing a Christmas shaker card. I had an idea that I wanted to use the Inverted Scallop Oval Stackers and this card developed from there.  


I started by cutting a Inverted Scallop Oval  into a white A2 top-fold card.  I then cut a piece of red card stock with a smaller oval from the Classic Silver Large Oval set so the red would show through behind the white.  I then glued a piece of Clear Acetate from the new kits and put foam tape behind it.  I trapped sparkly snowflakes in the oval window before sealing the back with tan patterned paper.


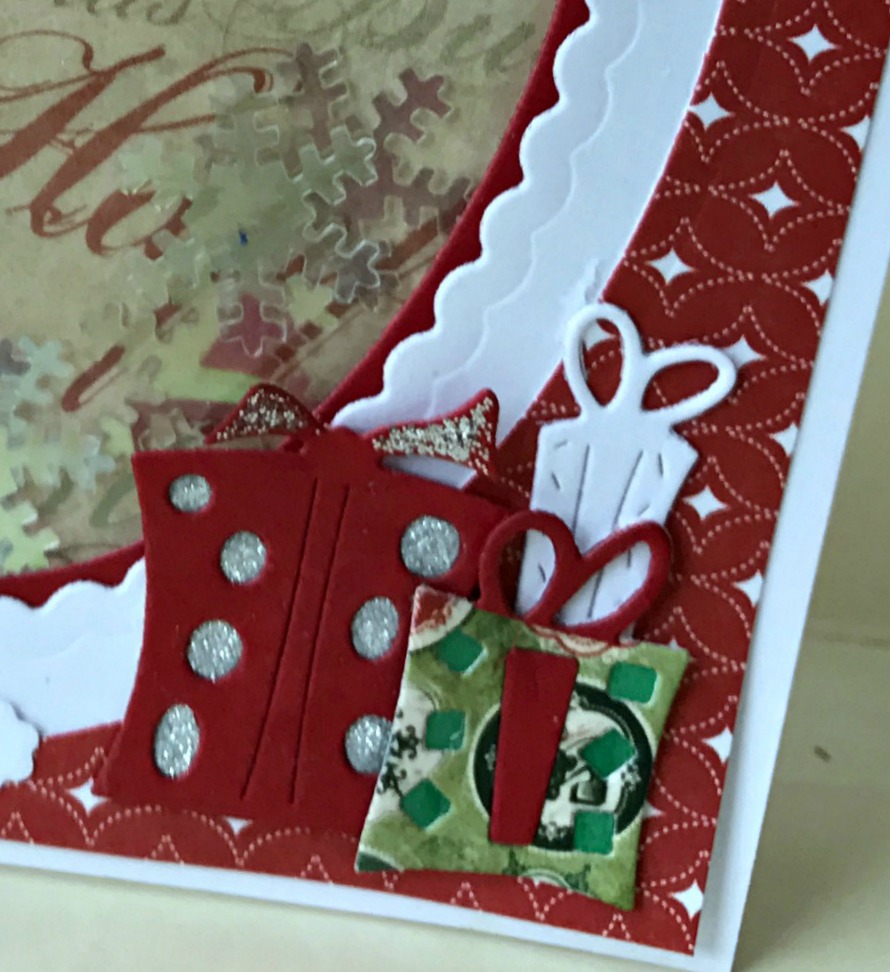
The white card front seemed too plain so I trimmed red patterned card stock to 1/4 inch smaller than the A2 card front and cut the center out with a large oval.  The card front is decorated with a tree from the Build a Christmas Tree set and presents from the Whimsical Christmas set.


Cheery Lynn Dies

Thanks for stopping by the blog today and make sure to join in the current Halloween challenge for a chance to win a $20 gift certificate to Cheer Lynn Designs.

Thursday, December 3, 2015

Cheery Lynn Tropical Christmas


Hello and happy Thursday!  I'm hosting the Cheery Lynn Blog today with this new card inspired by the current CLD challenge, Non-Traditional Christmas Colors as well as the song Mele Kalikimaka which I can't seem to get out of my head lately.  :)  I thought some of the new travel dies from CLD latest release would be perfect for a tropical themed Christmas card.  I started by using the Circle Stitch & Cut Tool set to cut a large circle.  The center was then cut using a smaller die from the Circle Stitch & Cut Tool set to create the pink ring.  A piece of plastic toy packaging was then glued to the back of the ring to create the window.


The palm tree and surfboard are from the newly released Surf's Up die set.  They are hidden but I also added a couple of the grass clumps set on the ground. To finish off the scene I added a small stitched circle for the sun.  I then sprinkled iridescent fake snow on top of the little scene and trapped the snow by putting a layer of double sided foam adhesive all around the ring.


I hope you like the result.  I love making little scenes on cards and with the bright colors this was a fun one to create.  

Cheery Lynn Dies

Thanks for stopping by the blog today and make sure to join in this week's Non-Traditional Christmas Colors challenge for a chance to win a $20 shopping spree at Cheery Lynn Designs!

Wednesday, September 23, 2015

Classy Cards Winter Shaker

Hello!  I'm sharing a shaker card today inspired by this week's challenge at Classy Cards 'n Such.  Pop on over and join in the fun, there's still time!


I started with a white side fold A2 card base.  I layered a piece of Kraft paper 1/8 inch smaller on all sides on top.  I then cut a smaller blue layer.  I cut the middle out with an oval die from my stash.  I glued the Memory Box Deer in Trees die to the underside of the blue layer and then glued a piece of clear plastic toy packaging on top.  I made an oval around the opening with thick foam adhesive from my stash.  I cut another Memory Box Deer in Trees and cut the deer off the die cut, I then also cut the bottom of the trees.  I glued the trees down to the Kraft paper.  I then sprinkled some chunky glitter to the center of the Kraft paper before removing the backing on the foam adhesive and laying it on top so the adhesive formed a little ring around the glitter.

Thanks so much for visiting and don't forget about joining our challenge this week!

Supplies


Wednesday, July 22, 2015

Classy Cards Enjoy

Hello!  I'm back with an inspiration card for Classy Cards 'n Such's new At the Beach Challenge.  This is shaker card.  I love making them, especially with little scenes inside.


I began by cutting the main ring with two Spellbinders circle dies.  I glued a piece of clear plastic salvaged from toy packaging on the back of the ring.  Then I constructed the little scene.  I cut a circle out of a darker blue paper and glued a ripped a piece of Kraft card stock on top for sand.

The clouds are from my stash but there is a similar Memory Box Puffy Clouds die in stock at the Classy Cards store.  All of the dies used inside the shaker are from Impression Obsession:  Sea Birds, Shore Birds, Grass and even the fence.  After the scene was glued in place I adhered Joy foam pads all around the circle and added some bugle beads from my stash before taking the backing off the foam adhesive and closing up the little shaker scene.

I used a grayish-tan card stock for the A2 card base, added a light blue card stock on top and then glued the shaker to the card.  A little bird from the Impression Obsession Shore birds and another cloud were glued to the outide of the shaker.  Last I added the Enjoy die cut.  It's from Cheery Lynn.  Unfortuntately it's no longer in stock but all Cheery Lynn dies are 50% off at Classy Cards with coupon CLD50.

Classy Cards 'n Such Supplies
Kraft Card Stock

Thanks for visiting today!

Wednesday, April 29, 2015

Classy Cards Cloud Confetti

Today I'm sharing a card inspired by the Classy Cards 'n Such's Cloudy Day challenge.  I tried to recreate the beautiful relaxing feel of the inspiration photo in a shaker card.  If you use my coupon Jenny-10 you can save 10% off your entire order at the CCNS store.


I made an A2 sized card out of a piece of Kraft Card Stock.  The Joy Crafts Waves were cut with a blue card stock from my stash.  I used the die as a stencil and highlighted the accents with peacock feathers distress ink and a Mini Ink Blending Tool.

The shaker was created by layering two sizes of nesting circle dies.  I glued a piece of clear packaging material I salvaged from toy packaging to the back of the circle.  The shop has clear card stock that would work perfectly for this.  I stamped my sentiment onto white card stock and sponged tumbled glass distress ink around the words.  Then I used a really thick foam adhesive to adhere the circle to the sentiment layer after adding some bugle beads inside. I glued the back of the sentiment layer to the card front.  I tucked another piece of waves into the front of the circle too trimming until I liked the result.

The clouds are from a die in my stash but you could achieve a similar look with many of the cloud dies or even cloud stencils currently in stock.  I added a couple of them using Joy Crafts Foam Adhesive Pads.

The seahorse was cut from Joy Crafts Crab & Seahorse die set and colored with distress ink.  I sponged more peacock feathers distress ink over the die using it as a stencil and then added liquid pearls for interest.
Supplies
Memory Box Puffy Clouds

Thanks for visiting!


Sunday, January 11, 2015

IO Winter Window

Hi, I created this for a challenge at Impression Obsession.  It's another shaker card.  It sparkles in real life but unfortunately most of it isn't showing up in the photo.

I combined two IO Window with Shutter dies to create this larger window.


Supplies
Impression Obsession CAC Reverse Quatrefoil Stamp

Challenge Entered
Impression Obsession Winter Chill

Thursday, January 8, 2015

Classy Cards Winter Window

Hi!  I'd like to share a new shaker card I've made.  I started by using a top folding A2 card base.  Then I cut a piece of card stock 1/4 of an inch smaller on all sides and then used a Cheery Lynn Window B die to cut the center.  


On the main card base I stamped the Stacy Stamps The Woods stamp using distress ink.  I stamped the stamp three times to fill the scene.  Then I sponged blue distress ink on the background using my Mini Ink Blending Tool.  I went over the trees with stickles for sparkle and let it dry.

Before I put a piece of salvaged plastic (from toy packaging) and foam tape around the card to create the shaker and trap the glitter, I cut a piece of frosted self adhesive paper using the Impression Obsession Icicle die and adhered it to the top of the window.  Once the shaker was assembled the adhesive side of the icicle picked up the glitter. The icicles aren't as distinct but really sparkle.


Once the shaker portion of the card was finished, the exterior of the card looked too simple.   I cut Cheery Lynn Holly Leaves, Flourish Band and Lace Corner Deco J to embellish the front.  I cut the lace corner four times and stacked them for dimension.  Before gluing them to the card I added white glitter to them.  I used the same glitter on the holly before I adhered the leaves with Joy Foam Pads.  

I embellished the Flourish band by coating it in Frantage Embossing Powder before gluing it to the card front.  And last, to finish the card I added three rhinestones to the holly leaves.  


Thanks for looking and remember all Cheery Lynn dies are 50% off with coupon CLD (only one coupon per order).  There's also still time to enter this week's Classy Cards 'n Such Challenge.  I hope you can join the fun this week!

Supplies
Cheery Lynn Window B
Cheery Lynn Holly Leaf Strip
Impression Obsession Icicles

Challenge Entered
Cheery Lynn Designs Winter Whites

Wednesday, September 17, 2014

Classy Cards Oh, Deer!

I made this card for the newest Classy Cards 'n Such "Santa's Reindeer" challenge.  This is a shaker card and was very simple to create.  I started with a 5.5"x5.5" square gray card and then cut each of the white and patterned paper layers a quarter of an inch smaller than the previous layer.


I cut the beautiful delicate frame from the PoppyStamps Claudette Frame die.  I then glued the white die cut to the soft pink patterned paper from the Love Letters paper pad and then cut out the center using a Spellbinders Classic Squares Small die.

I cut another square out of white card stock using the same Spellbinders square die and then embossed the square with the Anna Griffin Cherry Blossom embossing folder.  The flower burst embossed pattern reminds me of snowflakes.  I glued the white embossed square to the center of the large white layer so the embossing would show through the window.

I glued the gray Impression Obsession Deer off-center to the embossed square and then sprinkled loose clear iridescent snowflakes over him.  The edges of the deer's antlers and feet were brushed with Tea Dye Distress Ink.

I glued a clear plastic square (left over from packaging) to the reverse of the Love Letters pink paper, then formed a square around the underside of the central opening with foam tape.  I turned the panel right side up and pressed down on the foam tape to get a nice seal around the interior shaker box.

Thanks for visiting!  Remember to use my coupon code JENNY-10 to save an extra 10% off your entire purchase at the Classy Cards 'n Such Store.

Supplies
snowflake sprinkles
Distress Ink

Challenge Entered
ttcrd

Tuesday, July 15, 2014

Classy Cards Seaside Shaker

Good morning! Today is my first day posting for the Classy Cards 'n Such blog.  This is my design for this week's "A Day at the Beach" Challenge.  The inspiration for this card came from the JustRite Sea Shell Bay Labels Twenty Two stamp set.  I created my version with dies.


First, I cut out three square pieces of card stock.  The largest was a 5"x5" white card base, a blue square 4.5"x 4.5", and a Kraft square size 4"x4".  When stacked, cutting in 1/2 inch increments left a uniform quarter inch frame edge around each layer.

I cut out the centers of the kraft and blue layers using the Spellbinders Labels Twenty Two die.  I adhered the smaller layer on top of the larger layer with foam tape and then glued a piece of clear plastic (salvaged from toy packaging) underneath the bottom layer.

To create the beach and waves I ripped strips of colored and white card stock and then glued the layers together.  The sky was created by sponging blue distress ink.  I colored the Impression Obsession Sea Birds with distress markers.  Sequins were added to the shaker portion of the card before the final assembly. 


The Impression Obsession Grass (which is the prize being offered at CCNS this week!) was cut from green card stock, cut into two pieces and glued in between the blue layer and the clear plastic.  I thought it added extra dimension by keeping it outside of the shaker portion of the card.

Last, I sponged Antique Linen Distress Ink onto the small seahorse from the Cheery Lynn Seahorse Family die and then glued it and the Memory Box Small Ringlets to the front of the frame.  

If you'd like to see step-by-step photos, check out my tutorial at the Classy Cards 'n Such Blog.  Thanks for stopping by and don't forget to link-up your beach themed creation HERE for a chance to win a great prize!  Make sure to use my coupon code JENNY-10 to save 10% off your orders at CCNS.

Supplies
Impression Obsession Clouds
Kraft, blue & white cardstock
Distress Markers & Distress Ink

Challenges Entered
Artistic Inspiration #100*
Curtain Call Anything Goes
Crafty Card Makers Under the Sea
Open Minded Crafting Water, water everywhere
Come and Get it Colors of Summer
Allsorts Challenge Splish, Splash, Splosh

Tuesday, April 29, 2014

IO Sweet Shakes


I used IO's circle shaker frame die, lots of foam tape and a piece of clear plastic to make the window.   I thought the little iridescent beads looked like sprinkles!  :)  This card is "out of the box" for me because I haven't made a shaker card in a few years,  I hardly use yellow or patterned paper and I almost always embellish using paper flowers.  The cupcake stamp is from IO and was colored using copics.  I brushed the icing with a clear Wink of Stella brush for some extra sparkle. 

Thanks for visiting and have a great day! 

Supplies
Impression Obsession Circle Shaker Frame
Impression Obsession Stamp Cupcake F2178
Copics, Memento Ink Tuxedo Black, Distress Ink Antique Linen, Wink of Stella
Patterned paper, beads, ribbon, pink rhinestones, clear transparency sheet & button

Challenges Entered
Impression Obsession Out of the Box
Crafting from the heart Anything Goes
Cuttin and Stampin For Mom without Flowers
Sweet Pea Stampers Birthdays
The Rubber Buggy Colors of Easter