Thursday, December 31, 2015

Cheery Lynn Dream


Good Morning!  Since the challenge over at Cheery Lynn Designs is Anything Goes this week I thought I'd try my hand using some of my mixed media supplies.  I began with a piece of patterned card stock that I colored with distress ink.  I brushed a little shimmery embossing paste over the top.  I then ripped a piece of card stock that had been cut with the Lattice #3 die.  I added crackle paint to the top and glued it down to the main layer.  


The Chandelier die was colored with distress ink and chunky embossing powders.  I also sprayed some white dimensional spray in spots.  The Pierced Banner was cut from another piece of patterned card stock and a gold cord was tied to the side of it.  Dream is from the Dream Big set and the Sweet Christine flowers were cut with white and colored with ink.  I scrunched the flower petals to get an aged look. 


Last I cut a pink card with the  Horizon Coved Rectangle Boutique Stacker die to back it with.  I flipped the die over and traced the curve on the main layer and then cut the sides because I didn't have the matching die to layer inside.  


Cheery Lynn Dies

Thanks for visiting today and Happy New Year!  Make sure to join in this week's Anything Goes challenge, there's still time.

Thursday, December 24, 2015

Cheery Lynn Christmas Joy


Hi everyone!  I'm here on Christmas Eve wishing everyone a wonderful holiday!  For this card I used the Build a Christmas Tree die to create the decorated tree.  The tree part of the die comes in four pieces.  This tree looks like there was a lot of work involved but there really wasn't, this die made it so quick and simple.  The die cuts the main tree and three extra branch pieces to layer to create a fuller dimensional tree in one pass through my die cutting msachine.  It also comes with all the little candy canes, star, ornaments and tree skirt.  I used glitter glue on all the ornaments and star for sparkle.  I used a marker to add stripes to the candy canes.


The Joy sentiment comes from the Joy to the World Wreath and the corner is one of the three corners in the Lace Corner Deco I set.  I cut the center point off of it.  The scalloped edge die is the largest dies from the A2 Frames Rectangular Scalloped Set and the white oval was cut with the Oval Classic Silver Stackers set.


Cheery Lynn Dies Used

Thanks for visiting today and I hope you have a chance to join in the Thank You challenge this week for a chance to win $20 towards shopping at Cheery Lynn Designs.  Merry Christmas!

Thursday, December 17, 2015

Cheery Lynn You are Fabulous


Hi Crafty Friends!  I'm back today with a card inspired by Cheery Lynn Designs Sparkle & Shine Challenge.  I bought some new design paper recently and I wanted to make something with muted shades. When I put the pieces together I didn't feel there was enough contrast so I changed the colors by adding in the blue-greens and the card came together.


The card base is a 5.5" blue-green.  The gray patterned paper on top was cut with the Horizon Boutique Stacker Square. I used this die on my card last Thursday too.  It's my go-to large square die as it always adds a bit of interest and elegance.


I cut two Horizon Fishtail Banners and glued them so only the tails would show.  I wanted to give the illusion of one long banner.  I then adhered the Fleur De Lis Doily Circle cut out of gold glitter paper.   It's popped up with foam adhesive for dimension.  A blue striped paper cut with the Pierced Stacker #3 was layered on top and then I added the Royal Scandinavian Tag #1 stamped with the sentiment to the very top. I added clear glitter glue to the sides of the tag.  Last I cut gold corners using the extra corner included with the Royal Scandinavian Tag #1 and used one of the extra negative fleur de lis on the "fabulous" tag.  I hope you can see all the sparkle and shine in the photos.


Thanks for stopping by today and I hope you'll join this week's Sparkle & Shine Challenge for a chance to win $20 towards shopping at Cheery Lynn Designs.  I always love to see the beautiful challenge entries.  

Thursday, December 10, 2015

Cheery Lynn Christmas Cardinal


Hi, I'm back sharing a Christmas card inspired by this week's Cheery Lynn Designs challenge.  I began by layering the Horizon Square Boutique Stacker Frames in red on top of a 5.5 inch square card.  I took a smaller white piece of card stock and distressed the edges before layering a piece of design paper cut with the French Flair Boutique Stacker on top. 


I thought the Fancy Bird House decorated in red and green would make a cute holiday home for thie Cardinal from the Feathered Friends set.  I cut the birdhouse using kraft paper and then glued different colored papers to the back to add the detail I wanted.  I also double cut the fence and layered the white fence on top of the kraft base.  The snow is texture paste and then I also added sparkle by adding a glitter paste on top.  I used two layers of the Holly Lace Flourish for greenery and added a snowflake from the Snowflake Set #2.

Cheery Lynn Dies

Thanks for looking and make sure to join in this week's challenge for a chance to win a $20 shopping spree to the Cheery Lynn Designs shop!

Challenges Entered
Cardz 4 Galz Cute Christmas
CRAFT Challenge Christmas
Cute Card Thursday Add Some Glitter

Thursday, December 3, 2015

Cheery Lynn Tropical Christmas


Hello and happy Thursday!  I'm hosting the Cheery Lynn Blog today with this new card inspired by the current CLD challenge, Non-Traditional Christmas Colors as well as the song Mele Kalikimaka which I can't seem to get out of my head lately.  :)  I thought some of the new travel dies from CLD latest release would be perfect for a tropical themed Christmas card.  I started by using the Circle Stitch & Cut Tool set to cut a large circle.  The center was then cut using a smaller die from the Circle Stitch & Cut Tool set to create the pink ring.  A piece of plastic toy packaging was then glued to the back of the ring to create the window.


The palm tree and surfboard are from the newly released Surf's Up die set.  They are hidden but I also added a couple of the grass clumps set on the ground. To finish off the scene I added a small stitched circle for the sun.  I then sprinkled iridescent fake snow on top of the little scene and trapped the snow by putting a layer of double sided foam adhesive all around the ring.


I hope you like the result.  I love making little scenes on cards and with the bright colors this was a fun one to create.  

Cheery Lynn Dies

Thanks for stopping by the blog today and make sure to join in this week's Non-Traditional Christmas Colors challenge for a chance to win a $20 shopping spree at Cheery Lynn Designs!

Tuesday, December 1, 2015

Dies R Us Gold Christmas

Dies R Us Dies

Good Morning!  I'm back today sharing a new card inspired by the new challenge starting today at the Dies R Us Challenge Blog.  The theme is Christmas.  I was inspired by White Christmas but I ended up adding in some gold.  I guess my card is more of a monochromatic Christmas.  

I began with a cream 5.5 inch card and then layered a piece of design paper on top.  I cut a large circle out of the design paper with a Cheery Lynn Circle Stacker Set.  Then I glued a white scalloped ring to the front of the design paper.  I used the Cheery Lynn Horizon Boutique Circle and then cut the center out with the same circle from the Circle Stacker Set to form the ring.  

Before gluing down the design paper I played around with my Winter Neighborhood Border that I cut with a gold glitter paper.  I positioned it so all three houses would show through.  I cut a rounded piece of the same glitter paper and glued it in front of the border strip so the houses could be centered in the circle.  

Last to add a little more glitz I used a snowflake from the Cheery Lynn Snowflake Set 2 and glued it on top.  This kind of design would work well as a shaker card too but I was afraid the plastic would obscure the sparkle of the glitter paper.  

Thanks for stopping by today and make sure to submit your holiday project to the new Christmas challenge at Dies R Us for a chance to win a gift card to the store!

Thursday, November 26, 2015

Cheery Lynn Thanksgiving Blessings


Happy Thanksgiving!  When deciding what kind of a card I wanted to make this week for Cheery Lynn Designs I couldn't think of making a Thanksgiving card without using Tom the Turkey.  He's wonderful to color, those details on his body just pop out when you add color.


He's standing on an assortment of leaves also colored with distress inks from the Small Dimensional Leaves #2 die.  I added a scroll detail to the kraft paper using the Curved Border Set die.  

Cheery Lynn Designs Dies

I hope you like my project and don't forget to join in this week's Anything Goes challenge for a chance to win a $20 shopping spree to to Cheery Lynn Designs.  Happy Thanksgiving!

Thursday, November 19, 2015

Cheery Lynn Joy to the World


 Hi, I'm hosting the Cheery Lynn blog today with a new Christmas card.  I love this adorable reindeer die and thought it was the perfect time to try it out.  The details on it are wonderful and it doesn't need a lot of embellishment to really make a statement.  This card was quick enough to make that it could probably be replicated for Christmas cards.    


I first cut the Deutschland Boutique Stacker out of white cardstock and glued it to a green A2 sized card.  I then layered the second largest of the Royal Scandinavian Boutique Stacker Frames on top that was cut with kraft card stock.  I cut the Joy to the World die a couple of times to get the wreath green and the center dies (which I didn't cut out) cut with white and red paper to layer the Joy word on top.


Cheery Lynn Dies
Royal Scandinavian Boutique Stacker A2 Frame DL232

Thanks for stopping by today and don't forget to check out this week's Tag You're It challenge for a chance to win a $20 voucher to the Cheery Lynn Store!


Thursday, November 12, 2015

Cheery Lynn Enjoy


Good Morning!  I'm back today with a card inspired by Cheery Lynn Design's new Autumn Colors Challenge.  I began this card by cutting a light blue piece of card stock with the Card Cover Maker #4 and gluing it to a glittery patterned paper.  


I then cut Enjoy and the butterfly from the Small Exotic Butterflies #1 die and colored them with distress ink. To make the flowers I used the Black Eyed Susan Strip die and sponged yellow and orange distress ink on the centers before molding them with a styling tool and gluing the petals together.  To finish off the flowers I used a quilling tool to curl the centers that I had colored with green and brown distress ink.    


I added greens and mushrooms around the flowers, glued the butterfly in place and then added stickles to the butterfly's wings so he'd sparkle like the background paper.

Dies

Thanks for stopping by today and don't forget to enter this week's Autumn Colors Challenge for a chance to win $20 towards shopping at Cheery Lynn Designs.

Thursday, November 5, 2015

Cheery Lynn Thank You


Hi, I'm here today with a Thank You card inspired by Cheery Lynn's Give Thanks Challenge.  Blue is my favorite color and I tend to gravitate towards it when I want something both simple and elegant.  I love it paired with kraft paper.  I kept with a simple cool color scheme with this card.


First I cut the largest Horizon Square Boutique Stacker Frame from the set out of a solid blue paper.  I adhered it to a 5.5 inch square card front.  I then cut a piece of kraft paper to a 4.75 inch square.  I used the largest circle from the matching Horizon Circle Boutique Stacker Frame set to cut a piece of design paper.  I cut The Thank You twice and layered them, offsetting the blue one underneath for a shadow effect.  Before gluing the thank you down I added in the Notre Dame Cathedral Doily die in white underneath.  It fit perfectly onto the Horizon Circle layer.

Last I made the flowers using blue and white paper, a molding mat and tool and the Chrysanthemum strip die.  These are such quick and easy flowers, they always look delicate and lovely.  I added kraft leaves behind the flowers from the Build a Flowr #2 die and then glued chunky glass glitter to the center of the flowers for some sparkle.

If you haven't already, make sure to join this week's challenge for a chance to win a gift certificate to the Cheery Lynn Designs store!

Sunday, November 1, 2015

Dies R Us Fall Flowers


Hi everyone, I'm back with a new card inspired by the Dies R Us Challenge that begins today.  I hope you'll play along for a chance to win a gift certificate to Dies R Us.  The store is amazing, they have dies from so many companies!  

I made the flowers using two Cheery Lynn Gardenia dies.  I cut them out of orange paper and inked the edges with distress ink to give them a more natural appearance.  They were molding with a molding mat and stylus tools and the centers are rhinestones.  I added the dies from the Cheery Lynn Add a Flourish die and glued them to the kraft background paper that had the Cheery Lynn green Concentric Circles Border attached.

Thanks for looking and make sure to join in the challenge for a chance to win a gift voucher to the Dies R Us online store.

Cheery Lyynn Small Gardenia
Cheery Lynn Gardenia Strip

Thursday, October 22, 2015

Cheery Lynn Best Teacher Ever


I'm posting a Cheery Lynn card that could be a quick and simple thank you for teacher appreciation day. I'm a class mom this year for my son's teacher and sometimes I find it difficult to put together teacher cards.  This apple makes such a wonderful focal point on a card and it would be great on a tag or gift bag too.  


I began by layering a white piece of cardstock about A2 size on top of a red card base.  Then I cut the Royal Scandinavian Boutique Stacker A2 Frame out of Kraft paper and popped it up using a dimensional foam adhesive.  I glued the design paper to the top.  Then I added the Royal Scandinavian Doily Circle also cut out of kraft paper. The Best Teacher Ever apple was colored with distress ink and I paper pieced in the white words after gluing a backing to the apple.  I colored the little worm with distress ink too.

I love the way these doilies can turn a relatively simple card into a project that doesn't look it at all.  

Cheery Lynn Dies

Thanks for looking and don't forget to join in this week's Vintage challenge for a chance to win a gift certificate to Cheery Lynn Designs!

Thursday, October 15, 2015

Cheery Lynn Gone Fishing Memory Book


Hi, I'm thrilled to share some of Cheery Lynn Design's new release dies today.  This memory book was created with the Memory Book A2 Hearts & Ribbons die.  It's such a simple die but you can create some really amazing projects.

My children have been doing a lot of fishing with cub and boy scouts lately (even my daughter) so I thought this book would be perfect to display photos.  The great thing about it is that you can make the book as large as you want by varying the number of pages.  I wish I'd had this die sooner - it would have been perfect for making a personal gift for my daughter's teacher last year who retired.

I also layered the new Fishing Boat Set and Lighthouse Set dies to make a little scene.  Hope you like it and make sure to check out the Cheery Lynn Designs Blog today to see more inspiration from my amazing DT sisters!

Cheery Lynn Dies

Thursday, October 8, 2015

Cheery Lynn Happy Halloween


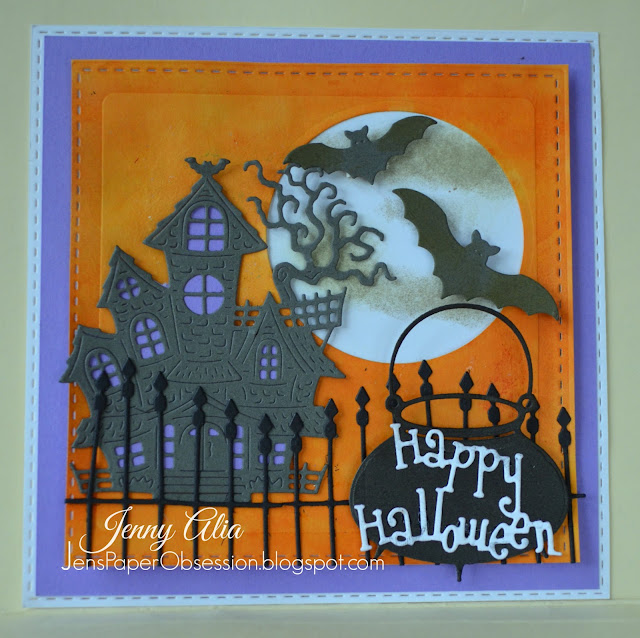
I'm posting today with a Halloween card inspired by this week's Cheery Lynn Designs challenge.  I've been having so much fun with all the new Cheery Lynn Halloween dies from the July release!  To make this card I began by cutting three large squares out of white and purple card stock.  I colored the smallest piece orange with distress ink.  After the distress ink dried I cut a circle out of the card stock with one of the small circles from the  Circle Classic Silver Stackers.  I then used the Square Stitching Tool to cut the stitches into the largest and smallest square for added texture.


I then got to work on the fun elements.  I cut the Home Sweet Home haunted house out of a dark gray card stock and backed it with purple for a spooky light inside.  I think this would be really neat to do with neon green behind too.  Then I glued the house down and then glued two Ornamental Gates side by side.  I cut the bottoms of them so they wouldn't be as tall.  

I sponged a little gray ink over a piece of white card stock and then glued it behind the orange layer.  The two bats from the Bat Family die were popped up with dimensional foam adhesive.  Last I added the cauldron from the Crafty Ann Halloween Set 2 and glued the Happy Halloween sentiment from the Happy Halloween Twiggy Wreath die set.

Cheery Lynn Dies
Bat Family B596

Thanks for visiting and I hope you can join us for this week's Halloween challenge for a chance to win a $20 gift certificate to Cheery Lynn Designs.

Saturday, October 3, 2015

Classy Cards Perfect Refreshment

Hello friends!  Unfortunately my non-crafting world is infringing on my crafting time lately and I need to scale back a little.  I'm sad to say this is my last post for the Classy Cards 'n Such Blog.  It's been a wonderful experience working with such an amazingly talented and supportive design team.  I will miss them all greatly and I know I'll be stopping by the blog daily for wonderful new inspiration.  You can still see a virtual library of my cards on the Classy Cards Blog and can always save 10% off your entire purchase at Classy Cards 'n Such Shop with coupon code JENNY-10.  


I began playing with my new Memory Box Distressed Addington Collage die and this card evolved.  I first cut a piece of Authentique Favorite paper with the Memory Box Distressed Addington die.  I used the die to cut the paper twice, once in the lower right corner and once in the top left.  I tried to layer this on top of an A2 white card but there wasn't enough contrast so instead I glued it to a piece of Kraft paper.  The Kraft panel was then adhered to the card front with Joy Foam Pads.

I cut the Memory Box Quinn Flourish Circle and colored it with distress ink.  The nest and bird were cut using the Memory Box Meadowbird Branch dies.  There's such a nice assortment of foliage in this set.  The Quinn Flourish was also adhered using Joy Foam Pads for additional dimension.  Last I stamped the Impression Obsession Sit in the Shade quote on the front of the card. 

Supplies
Thanks so much for joining me today and for being such wonderful blog followers!  Don't forget to join in Classy Cards 'n Such's challenges for new chances weekly to win a wonderful prize or badge for your blog.  Hugs!

Thursday, October 1, 2015

Cheery Lynn Big Day


Hi, I'm posting today with a new card I made using a few new dies.  I love how delicate and intricate this Dutch Daisy Doily Square die is and couldn't wait to play with it.


I first cut the Dutch Daisy Doily Square out of a blue-green paper.  I then cut three layers using the French Flair Classic Stackers.  I used the largest to cut the kraft card base and then a smaller one to back the phrase created by the On YourDream Big and Day words that were cut with the same blue paper used for the Dutch Daisy Doily.  

The Sweet Williams Strip flowers were cut out of a cream patterned paper.  The edges were colored with blue distress ink and then they were molded using a stylus and molding mat.  I stacked and glued them together and then used double sided tape to adhere them to the card front.  Last, I tucked in some Olive Branches and my go-to foliage, Flourish Leaf Strip die cuts and glued pearl centers on the flowers.

Cheery Lynn Dies

Thanks for visting today and make sure to join in this week's Anything Goes challenge for a chance to win a $20 gift certificate towards shopping at Cheery Lynn Designs!

Dies R Us Boo!


Good Morning!  I'm back today with another Halloween card.  Make sure to check out all my Dies R Us teammates' cards - they are spectacular!  I just love spooky things but I'm such a wimp when it comes to scary movies.

This was such a quick card and fun to make.  I cut the frame using the Memory box Sleepy Hollow Oval Frame.  This die isn't currently in stock but  if you used an oval die and some of the new Memory Box tree dies you could create a similar look.  Then I colored it with distress ink and glued it to a piece of purple background paper.  I then used foam adhesive to adhere it to the back of the card front, positioning it so oval frame fit perfectly in the negative space of the cut-out.  The foam tape really gives the card dimension.  I then glued ghosts around from Memory Box's Swirling Ghosts die. 

Thanks for visiting!  I hope you enjoyed my project and make sure to join in the new Dies R Us Boo to You challenge beginning today!

Dies R Us Dies
Memory Box Sleepy Hollow Oval Frame

Wednesday, September 30, 2015

Classy Cards Fall Watercolors

Hi, I'm sharing an inspiration card for the current Classy Cards 'n Such challenge.  I only used one die on this card, but it is so lovely it can stand on it's own.  Coupon code JENNY-10 will give you 10% your total purchase at Classy Cards 'n Such.


I cut the oval center out with the Memory Box Country Fence Oval Frame die.  I colored the die cut with distress inks, trying to use more muted greens so the grass didn't look too Spring-like.  I set the die cut aside to dry and took another piece of white card stock and created a background.  

I misted the background paper using Tattered Angels Pearl Glimmer Mist.  It has a lovely sheen to it.  Then I sprinkled the new Ken Oliver Earth Tones Color Bursts over the damp paper.  The colors spread and blend together so nicely.  It's also a lot of fun to do!  The background looks like an impressionist or maybe pointalist painting.

I glued the die cut to the background and positioned the white oval frame around the die.  I then took the whole project and mounted it onto a light blue A2 sized card.

Thanks for visiting and make sure to check out this week's Feeling Fall-ish challenge for a chance to win a great prize. You can even link up below!

Thursday, September 24, 2015

Cheery Lynn Fall Thanks

Good Morning!  I'm sharing a fall card created for Cheery Lynn Designs.  This Mesh Border die just called to me, it reminded me of a fall themed table runner my sister-in-law has.  


I used an A2 dark red card base and then glued a piece of white card stock on top.  I used the Mesh Border die that I cut with kraft paper and glued it down.  The I added leaves cut with the Dimensional Small Leaves #2 die.  The shading and color blending was all done with a cosmetic sponge and distress ink.  I arranged the leaves and tacked them down to the card with double sided adhesive tape.  


I then cut the Thank You #2 three times and glued the layers together.  The dark red paper is heavy weight and three layers together make the die cut look like chipboard.  


Dies

Thanks for visiting today and make sure to check out this week's lace challenge for a chance to win a $15 gift card to Cheery Lynn Designs!

Wednesday, September 23, 2015

Classy Cards Winter Shaker

Hello!  I'm sharing a shaker card today inspired by this week's challenge at Classy Cards 'n Such.  Pop on over and join in the fun, there's still time!


I started with a white side fold A2 card base.  I layered a piece of Kraft paper 1/8 inch smaller on all sides on top.  I then cut a smaller blue layer.  I cut the middle out with an oval die from my stash.  I glued the Memory Box Deer in Trees die to the underside of the blue layer and then glued a piece of clear plastic toy packaging on top.  I made an oval around the opening with thick foam adhesive from my stash.  I cut another Memory Box Deer in Trees and cut the deer off the die cut, I then also cut the bottom of the trees.  I glued the trees down to the Kraft paper.  I then sprinkled some chunky glitter to the center of the Kraft paper before removing the backing on the foam adhesive and laying it on top so the adhesive formed a little ring around the glitter.

Thanks so much for visiting and don't forget about joining our challenge this week!

Supplies


Saturday, September 19, 2015

Classy Cards Rambling Roses

Hello!  I'm back today with a birthday card.  I can never seem to make enough!  I'm finally getting back into the swing of a routine again now that my children are back in school and hopefully my card mojo will return!  


I haven't used many background stamps in a while and I forgot how much I love them.  For this card I used Impression Obsession's Distressed Brick Stamp with distress ink.  I adhered the brick panel to a piece of Kraft card stock with Joy Crafts Foam pads.  

I envisioned a climbing rose but wanted to put together a card that wasn't time intensive so instead of making a ton of little flowers I used this beautiful Tattered Lace Rambling Rose die.  It has so much detail and I absolutely love the leaves.  They are so delicate and lacy.  The roses and leaves were colored with distress ink.  I cut the image a second time and added the red roses on top.  You can see some of the white rose peeking through underneath since I tried to only color the leaves of the bottom layer.  It reminds me of this beautiful red and white rose I have in my garden.  Each rose on the bush is so different and stunning.

Happy Birthday was cut with Impression Obsession's Greeting die set.  It's really perfect for so many occasions.  I keep hoping they'll release a holiday words version.  

Thanks for visiting and make sure to join our weekly challenge for a chance to win a great prize!

Classy Cards Supplies

Thursday, September 17, 2015

Cheery Lynn Dream Big


Hi, I'm posting today with a card I created for Cheery Lynn Designs.  This evolved from a piece of patterned paper.  The paper is covered in blue-green, orange and pink circles.  I tried to match the colors in my flowers, words and butterfly.


I first cut the Mirror Mirror Doily Frame with green patterned paper and turned it sideways.  I cut a center out of a cream card stock that matched the 5.5" card base and layered it on top, popped up with foam adhesive.  I added the Dream Big Phrase and the butterfly from Small Exotic Butterflies #2 and colored them with pink distress ink.  

The white flowers were cut using the Shasta Daisy die.  The little orange-pink Sweet Christine flowers were tucked into the arrangement and glued using a double sided tape.  I added rhinestone and pearl centers to the flowers. The leaves are from the Flourish Leaf Strip and were colored with distress ink.  

Cheery Lynn Dies

Thanks so much for visiting today and don't forget to join in this week's challenge Things With Wings for a chance to win a great prize!

Wednesday, September 16, 2015

Classy Cards A Little Birdie

Hi Friends!  Today I'm sharing a paper pieced card I made inspired by the current  Classy Cards 'n Such challenge "An Apple a Day".


I began by cutting a piece of the Enchanted Garden Paper.  This paper is just so lovely I tend to hoard it but the pinks and greens were perfect for this challenge and needed to come out to play.  I cut the pink paper using scalloped rectangle dies from my stash and backed it with a piece of light blue card stock to mimic a blue sky.

I cut the main die which is also from my stash and colored it with Distress Ink.  I then cut the die again using a green patterned paper from the Enchanted Garden Stack.  I cut out the leaves individually and glued them on top of the original die cut.  

I sprayed the bird wings with Pearl Glimmer Mist before adhering them to the birds so they have a little sparkle.  Last I thought the tree needed a little extra pizzaz so I turned it into an apple tree by adding apples from the Impression Obsession Bushel of Apples die and dew drops for a little more dimension and interest.  

Thanks for visting and make sure to check out this week's challenge for a chance to win a great prize!

Classy Cards 'n Such Supplies

Scrapyland Happy 6th!

Hello!  I'm posting today with a neon birthday card I made for Scrapyland's new challenge  "Add an Image". 


I wanted to make something special for my niece's sixth birthday and this is what I created.  I stamped the image, colored her in with both Copics and Shin-han markers and then cut her out with a Cheery Lynn Oval die.  I sponged distress ink around the circle and then popped her up with foam tape on top of some designer paper.  

I sprinkled a number of die cuts around her.  It was my first time using this Die Versions Corner Concepts die but it's perfect for simple birthday cards and I think I'll be using it MUCH more now.  The cake in the circle is another die from my stash and I glued the Avery Elle Count on It number six to a small tag.  I made the six and cupcake sparkly by adding glitter glue.

Thanks for looking and I hope you can join the new Scrapyland challenge for a chance to win a gift certificate to the store!  

Scrapyland Dies