Showing posts with label Steampunk. Show all posts

Sunday, August 13, 2017

Cheery Lynn The Little Things Steampunk


Hi Everyone!  I've been itching to use the new patina paints I picked up last week and the first thing I wanted to paint with them is these gears.  The new Cheery Lynn Vintage Hot Air Balloon has been calling to me too.  I use the smaller hot air balloons a lot and this one is different enough both in size and style that it needed a place in my die collection.


I love how the background of the balloon is a perfect fit behind so it's easy to add additional colors.  I'm looking forward to cutting and paper piecing different colors inside the balloon to create a different look. 

I painted the Gears and embossed both the Vintage Hot Air Balloon and the heart lock from the Whimsical Lock and Key set.  I adhered the front of the balloon to the background with a tinted glaze.  I found the sentiment in a paper pack and thought it was the right size to add to the card. Last I added the black rhinestones and the gold thread to the lock.

Cheery Lynn Dies

Thanks for stopping by the blog today!
Hugs, Jenny

Wednesday, July 15, 2015

Scrapyland Happy Birthday!

Hi, I'm back today with a tag for Scrapyland's Vintage/Steampunk Challenge.  This is a fun challenge, get out those supplies and come play along!  

I also want to wish my wonderful friend Darlene a very HAPPY BIRTHDAY!  I hope it's a wonderful day and I've also joined Darlene's Birthday Blog Hop.  If you want to see all the wonderful projects created for her scroll down to see my earlier post today.


This tag was a lot of fun to create.  I usually think of steampunk cards in brown shades but I noticed a few with pretty blue backgrounds on pinterest and the color inspired this tag.  After coloring the background with distress inks I cut the Memory Box Sketchy Rings.  I embellished it with a frantae embossing powder and a verdigris embossing powder.  I set it aside and used a god embossing paste and a stars stencil to add to the background.  I thought the blue with the darker edges looked like a night sky.  


On the bottom right side I added a chunky silver glitter to the stars - I liked the gold stars I just really wanted to play with a new-for-me product.  I cut the Cheery Lynn Hot Air Balloon, colored it with distress ink and glued rhinestones to it.  I cut the Cheery Lynn Happy and Birthday, colored them yellow with distress ink and glued them on top of the rings.  The last thing I added was the blue cord and three green dew drops.

Supplies
Cheery Lynn Birthday

Thanks for visiting!

Thursday, July 9, 2015

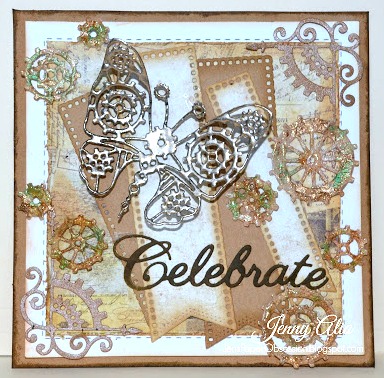
Cheery Lynn Steampunk Butterfly


Hello, I'm back with a steampunk inspired created with Cheery Lynn Designs dies.  Everything is layered on a 5.5" kraft card base.  I added a white layer that I distressed the edges of and cut with the Square Stitch Nesting  die.  I topped the white layer with a piece of patterned card stock. I aged this with a distressing tool and colored the edges with distress ink.  


I used glued two sizes of Pierced Banners and randomly layered them before adding the fun elements.  This Gears Butterfly was embossed with frantage powder for an uneven but metallic appearance and then popped up using foam tape.


The Gears were coated with clear crackle paint and perfect pearls.  The Steampunk Corner die cuts were colored with a metallic distress stain.  Before gluing all the gears in place I cut the larger Celebrate die cut, colored it with distress ink and glued it to the card.

Cheery Lynn Dies

Thanks for visiting and make sure to join in the fun at the In Stitches Challenge this week for a chance to win $20 towards shopping at Cheery Lynn Designs.

Thursday, May 28, 2015

Cheery Lynn Amazing

Hi, I'm here today with a new card for Cheery Lynn Designs.  I don't often make shaped cards and thought I'd give it a try, I thought the round shape nicely complimented the hot air balloon.


The bottom layer is the largest from the Circle Scalloped die set topped by the largest Circle Classic Silver Stackers and then another scalloped circle was added to that cut from design paper.  The two large bottom layers were colored with distress inks.  

I cut the balloon die, backed it with the matching angel wing and colored both with distress inks.  The compass, and barbed wire were also colored with distress ink as was the Fishtail Banner.  The sentiment is a stamp from Riley & Company.  I used foam tape to pop up the banner, balloon and compass dies and for added bling, glued flat-backed rhinestones to the compass and balloon.  


I cut the Fleur de Lis and used a frantage silver embossing powder on it for an aged look before gluing to the banner.

Cheery Lynn Dies

Thanks for visiting and and be sure to check out this week's Anything Goes challenge for a chance to win $20 towards shopping at Cheery Lynn Designs!  Hugs!

Challenges Entered
Crafters Cafe One for the Boys
Double Click Skittles Father's Day/Man
Inspiration Destination Anything Goes
Mod Squad Masculine
Simon Says Stamp Anything Goes
Riley and Co. Travel
Kraftin Kimmie Anything Goes

Friday, April 4, 2014

Steampunk Friends

Hello and welcome!  It's my second time trying steampunk and I think the colors ended up a bit too bright but maybe next time I'll get it right!  :) 


This Tidlyinks stamp is from a set called "Grow old friends".  I wanted her face to be pale but she is actually colored with copics and isn't quite as pale as she appears.  All of the white cardstock has been brushed lightly with distress ink which doesn't seem to be showing well either.  Last, I used a Wink of Stella brush to add shimmer. The paper embellishments were all made using dies.  I colored the gears with brown and metallic distress stain and then coated them with two layers of Rock Candy crackle paint.  In between coats of crackle, I brushed copper pearl-ex powder on the gears. 


The blue-green cardstock left of the main image was embossed with a Tim Holtz gears embossing folder.  Metallic ink was rubbed over the raised parts before I sponged it with distress ink, dabbed on additional metallic stain and stamped over it  randomly.  On the right I glued sheet music onto tan cardstock, used distress ink and a distress tool to rough up the edges and then painted over it with crackle paint.  Neither of the two main layers is very prominent under all the "stuff" but they're there, really! 

I'd like to thank my husband for having clothing that sheds all sorts of interesting threads in the laundry (as that's where the bottom string came from) as well as mention my 14 month old as he personally distressed the small blue rose in the photo.  "Bay Joe" has provided greatly needed distressing on many of my die cut flowers of late as he attempts (and often succeeds) to taste them all.  Thanks guys!

Thanks for stopping by!

Supplies
Tidly Inks Grow old Friends Stamp
La-La Land Rolled Rose Set
Die-Namics Layered Rose
Marianne Creatables - LR192
Sizzix Fancy Labels
Copic Markers, Memento Ink Tuxedo black, Distress Ink - Tea Dye & Antique Linen
Tim Holtz Rock Candy Crackle Paint, Wink of Stella Clear Brush
String, buttons, brads, pearl, rhinestone (from my stash)

Challenges Entered
Crafty Bloggers Network Die Cuts
Sweet Pea Stampers Distress to the max
Alphabet Challenge D for dies
Time 4 Scrap Earth Hour
Shopping Our Stash Faux Sure
Crafting for all Seasons Dies & punches
CMC Copics Sparkle It
Crazy challenge Bling it Up
Through the Purple Haze Steampunk
4craftychicks Color a Stamped Image

Sunday, February 23, 2014

Fleur de Lis Gears


I won at IO!  I was so excited -  it's so nice to get some new goodies and not have my husband glower (yes, much like Twilight's Edward - he glowers) when a new package arrives at the front door.  It was a lot of fun to create projects for the Impression Obsession Birthday Challenge.  Hopefully this will continue to motivate me to use my wonderful (and as my 9 year old would say, "AWESOME") craft collection.

I thought I'd share another recent card I made.  It's very different than my usual cards.  I'd almost call it grungy. I was going for steampunk with the gears but it didn't quite work out the way I'd envisioned.

The gears were cut from white card stock, colored with distress ink, sprayed with shimmer spritz, and then dusted with pearl ex to add more luster.   I tried to make them look metallic and old.  The leafy tree branch was coated with Tsukineko Shimmer Spritz too so it shines.

Thanks for looking!

Materials
Tim Holtz Stamps
Impression Obsession Leafy Branch
Marianne Designs Ribbon Weaving (for the flower)
Spellbinders Sprightly Sprocket
Spellbinders Fleur de lis Accents
Spellbinders Labels Eight
Spellbinders A2 Curved Matting Basics B
Tim Holtz distress ink
Shimmer spritz
Pearl-Ex powder (to add luster to the gears)