Thursday, July 30, 2015

Cheery Lynn Gingerbread Christmas


 Hello! I'm sharing a Christmas card in July today for Cheery Lynn Designs!  It's 90 degrees in NY today but I wanted to play with this adorable Gingerbread Family  die.


The card base is a green A2 card.  I cut a piece of patterned card stock slightly smaller to layer on top. Then I cut three gingerbread men out of a creamy gray paper. I glued white card stock to the backs so the eyes and buttons would look like they were made with white icing.  A little distress ink was sponged around the edges and I added red pearls for buttons and the center of the bow.


The circle was cut with the new Circle Stitch & Cut Tool.  Merry Christmas is a Crafty Ann die, I just love this vintage font. Cheery Lynn is now carrying all the Crafty Ann dies.  You can see them all HERE.  Last I added the snowflake from the Snowflake Set 2 and glued a sparkly silver embellishment to the center.

Thanks for visting and make sure you link up a card to join in this week's Anything Goes Challenge!  Hugs, Jenny

Challenge Entered
Send a Smile 4 Kids Christmas 4 Kids

Wednesday, July 29, 2015

Classy Cards Striped Sofia

Hi, I'm here today with a card inspired by Classy Cards 'n Such's Colors and Patterns challenge.   When I saw the inspiration photo it reminded me of this adorable Stampavie Sofia Wishes stamp.


I stamped Sofia once on white card stock and then a second time onto a piece of green patterned paper from the Graphic 45 Botanical Tea paper pack.  This has become one of my go-to paper pads, I love the slightly muted colors and print patterns.

I colored her with alcohol ink markers and then cut out her dress and glued it over her body.  I was planning on paper piecing her apron too but the bow was tricky to cut so I ended up coloring in the apron with a yellow-orange marker.

I cut Sofia out with a Spellbinders Elegant Oval die and popped the oval up with Joy Crafts Foam Adhesive.  The green striped paper is also from the Graphic 45 Botanical Tea paper. To add a little interest I wrapped the card with twine from my stash and added adhesive Mother of Pearl Rhinestones.

Thanks for visiting and make sure you join in this week's challenge for a chance to win a great prize!

Supplies


Saturday, July 25, 2015

Classy Cards Hooray

Hi, I'm here today with a card for Classy Cards 'n Such featuring the Impression Obsession Butterfly die.


I started with a white A2 size card.  I cut the butterfly out and then used the Impression Obsession Open Scroll Butterfly die cut and colored it with Tarnished Brass Distress Stain.  It has a lovely shimmer.  I set the butterfly aside to dry, cut the Hooray out with a die from my stash and glued a piece of Graphic 45 Botanical Tea paper to the underside of the card.


I glued the center back into position and curled the wings a bit.  Then I glued five LaCreme Baby Pearls to the butterfly body.  I glued in some negative white pieces from the word Hooray and voila, the card was done!  This is a quick and simple card to recreate and changing the colors would give it a whole new look.  

Thanks for visiting!

Supplies

Thursday, July 23, 2015

Cheery Lynn Turkey Time


Hello!  I'm sharing my Cheery Lynn inspiration card featuring Tom the Turkey.  This die is so incredibly detailed, it's amazing.  I didn't end up using a lot of embellishments because Tom didn't need it.  He can stand on his own.  I colored him with distress ink, fluffed out his tail feathers and popped him up with foam adhesive.  


He's standing on four layers of card stock that I cut using the Pierced Stacker #3 die.  The top layer was cut with the die and then I hand cut the pierced edge off so it would be slightly smaller than the orange layer.  The largest white layer of Pierced Stacker #3 was made by tracing the outside of the die and then hand cutting the edge with a scissor.  


The stitched detail on the 5.5" base layer was cut using the Square Stitch Nesting  die.  This die doesn't cut the squares but it does add these stitches in a variety of sizes.  It's perfect for adding a little extra detail.  Last I cut flourishes from the Leafy Flourish die, added a little distress ink to the edges and tucked the die cuts around the Turkey.

Cheery Lynn Dies

Thanks for visiting and don't forget to check out this week's Silver and/or Gold Challenge for a chance to win $20 towards shopping at Cheery Lynn Designs.  

Wednesday, July 22, 2015

Classy Cards Enjoy

Hello!  I'm back with an inspiration card for Classy Cards 'n Such's new At the Beach Challenge.  This is shaker card.  I love making them, especially with little scenes inside.


I began by cutting the main ring with two Spellbinders circle dies.  I glued a piece of clear plastic salvaged from toy packaging on the back of the ring.  Then I constructed the little scene.  I cut a circle out of a darker blue paper and glued a ripped a piece of Kraft card stock on top for sand.

The clouds are from my stash but there is a similar Memory Box Puffy Clouds die in stock at the Classy Cards store.  All of the dies used inside the shaker are from Impression Obsession:  Sea Birds, Shore Birds, Grass and even the fence.  After the scene was glued in place I adhered Joy foam pads all around the circle and added some bugle beads from my stash before taking the backing off the foam adhesive and closing up the little shaker scene.

I used a grayish-tan card stock for the A2 card base, added a light blue card stock on top and then glued the shaker to the card.  A little bird from the Impression Obsession Shore birds and another cloud were glued to the outide of the shaker.  Last I added the Enjoy die cut.  It's from Cheery Lynn.  Unfortuntately it's no longer in stock but all Cheery Lynn dies are 50% off at Classy Cards with coupon CLD50.

Classy Cards 'n Such Supplies
Kraft Card Stock

Thanks for visiting today!

Thursday, July 16, 2015

Cheery Lynn Howdy!


Happy Thursday!  I'm back today with a card using this adorable Clarabell the Cow from the new Cheery Lynn Designs release.  If you missed yesterday's post on the CLD blog you can see all the new Cheery Lynn July release dies HERE.  My card was inspired bu the current White-on-White Challenge.

I used a cream colored 5.5" card base and layered the largest Horizon Square Boutique Stacker on top cut out of a shimmery card stock.  I layered an English Tea Party Doily die cut, cut with bright white card stock on top.  The center of the doily was cut out with the second smallest of the Silver Stacker Circle dies.  Clarabell the Cow was cut with a piece of the base card stock and the Howdy was cut again in white and glued in for contrast.  I also replaced her eyebrows with white ones.


The flowers were made using a molding mat, stylus tool and the Tea Rose Medium die.  I used a shimmery darker cream card stock for the flowers.  The leaves are from the Branches die.

Last I thought Clarabell needed a little flair so she's wearing the hat from the Arizona Cowboy die set.
Cheery Lynn Dies

Thanks for visiting and make sure to join in the White-on-White Challenge this week for a chance to win $20 towards shopping (including the new release!) at Cheery Lynn Designs!

Wednesday, July 15, 2015

Classy Cards Bird Picnic

Hello!  Today I'm sharing an inspiration card for the Summer Picnic Challenge at Classy Cards 'n Such.  I sorted through all my food dies and this is what came together. I hope you like the result.  Remember to use my coupon code Jenny-10 at the Classy Cards Shop to receive 10% off your entire purchase.


This challenge calls for kraft, red and white to be used so I cut a piece of red paper for the picnic blanket.  I used Kraft Card Stock to cut the Poppystamps Bushel Basket and colored the bands with distress ink.  The handled basket is a die from my stash.  The apples were cut from the Impression Obsession Bushel of Apples die.  The Memory Box Scalloped Cake Stand was colored with pumice stone distress ink and the Memory Box Petite Cakes was colored with pink distress ink.

I stamped the Impression Obsession  Why Do Birds stamp with black ink and then added the Impression Obsession Leafy Branches to the side. The little bird is from Memory Box's Open Studio Meadowbird Branch set.  I colored the body with pink distress ink and the smaller accent feathers with brown distress ink.

Thanks for visiting and I can't wait to see your Summer Picnic creations this week!

Classy Cards 'n Such Supplies

An InLinkz Link-up

Challenge Entered
Poppystamps A Day in the Park

Classy Cards Red Bird

Hi I'm back today with a new card inspired by this week's Classy Cards 'n Such challenge Summer Picnic Color.  I focused more on the color than the picnic theme with this card.


 I started with a Kraft 5.5 inch card base, added a white layer on top that was cut with a die in my stash.  I used more Kraft paper to cut the Poppystamps Claudette Frame that I then cut the center out of. I love playing with Frantage Embossing Powder.  Using this Poppystamps Vintage Birdcage die gave me a perfect opportunity to use it.  I cut the birdcage, coated it with versamark ink, sprinkled Vintage on it and heated with a heat tool from behind.  I like the varied looks you can achieve with the Frantage powder.  

I added red color to the card with a bird from the Memory Box Resting Birds die.  The result makes this look more like a holiday card than a summer card though.  Kraft paper was also used to create foliage from the Memory Box Open Studio Meadowbird Branch die.  Some of the other foliage was cut in red and it makes the branches look like red berries. The flowers and rhinestones are from a die in my stash.  

Thanks for visting and don't forget to check out the wonderful new products in stock in the store and join this week's challenge.

Supplies

Cheery Lynn Pumpkin Patch


Hi Everyone!  I am beyond excited to show you some brand new Cheery Lynn Designs dies today!  This is a step card I created using some of the brand spankin' new July release dies.


I cut the step card with the Step Card Set 3 die from the April release.  Using this die makes every card a little more fun.  I colored the card with black and gray distress ink and covered up the moon with a small circle die from the Circle Classic Stackers L4 Set.  On the right side of the card I added the Grass Border 2 to each of the layers. I glued the smallest Jack-o-lantern to the front fold, a larger Jack-o-lantern and Tombstone to the center, and the Spider Net die to the last layer also adhering it to the left side of the card.


I added the Victorian Picket Fence die to the front of the card.  I did modify the fence by cutting pieces out of it to make it look old.  I also cut the bottom so it would't obscure some of the other elements.


On top of the fence I popped up the Horrible Cat using foam adhesive.  A yellow card stock was added behind his face to get the yellow eyes.  Additionally I painted the eyes with gold shimmery paint.  The spider from the Spider Net die was made the same way with yellow card stock behind.


If you haven't gotten a chance to see them all yet, check out my teammates beautiful creations using more of the new release dies today at Cheery Lynn!


Cheery Lynn Dies

Scrapyland Happy Birthday!

Hi, I'm back today with a tag for Scrapyland's Vintage/Steampunk Challenge.  This is a fun challenge, get out those supplies and come play along!  

I also want to wish my wonderful friend Darlene a very HAPPY BIRTHDAY!  I hope it's a wonderful day and I've also joined Darlene's Birthday Blog Hop.  If you want to see all the wonderful projects created for her scroll down to see my earlier post today.


This tag was a lot of fun to create.  I usually think of steampunk cards in brown shades but I noticed a few with pretty blue backgrounds on pinterest and the color inspired this tag.  After coloring the background with distress inks I cut the Memory Box Sketchy Rings.  I embellished it with a frantae embossing powder and a verdigris embossing powder.  I set it aside and used a god embossing paste and a stars stencil to add to the background.  I thought the blue with the darker edges looked like a night sky.  


On the bottom right side I added a chunky silver glitter to the stars - I liked the gold stars I just really wanted to play with a new-for-me product.  I cut the Cheery Lynn Hot Air Balloon, colored it with distress ink and glued rhinestones to it.  I cut the Cheery Lynn Happy and Birthday, colored them yellow with distress ink and glued them on top of the rings.  The last thing I added was the blue cord and three green dew drops.

Supplies
Cheery Lynn Birthday

Thanks for visiting!

Darlene's Happy Birthday Blog Hop!


We want to wish Darlene a  very HAPPY BIRTHDAY today in a special way!
Hope you will join in the fun and get some amazing birthday card ideas along the way.
We also hope you will stop over to Darlene's blog and wish her a
Happy Birthday !
Let the party begin!!!!

Jenny....you are here!!
Darlene....our birthday girl!

Here's my card from a stamp created from one of my doodles...
Supplies
Stampin' Up Cheesecloth Background
Spellbinders Classic Circles
Spellbinders Labels die
Impression Obsession Spiral Flowers
MFT Rose
Stampin' Up Corner Rounder punch
Copics, TH Distress Ink, Judkins Color Dusters, Stickles

Next stop is Darlene....or you can start all over!!!

Saturday, July 11, 2015

Classy Cards Vintage Rose

Hi, I'm sharing a card today at the Classy Cards 'n Such Blog.  I was inspired by the Graphic 45 Botanical Tea paper.  I usually make pink flowers but I thought I'd mix things up.  I seem to be in a blue flower mood lately. I've also run out of pink papers in this gorgeous paper pad.  I will have to remedy that soon.  


The base card is an A2 size.  I cut a green layer from my stash 1/4 inch smaller and then the floral Botanical Tea paper 1/4 inch smaller than the green.  This left a 1/8 inch border on all sides.  Both the flower and just because sentiment from the JustRite Floral Vintage Labels Two were stamped with memento black ink.  

The flower was colored with alcohol ink markers.  I cut the image with Spellbinders Romantic Rectangles die and added a Silver Rock Candy to the center.  I love the sparkle Rock Candy adds.

Thanks for visiting and don't forget to join our weekly challenges at Classy Cards 'n Such for a chance to win a great prize!

Classy Cards Supplies

Thursday, July 9, 2015

Cheery Lynn Steampunk Butterfly


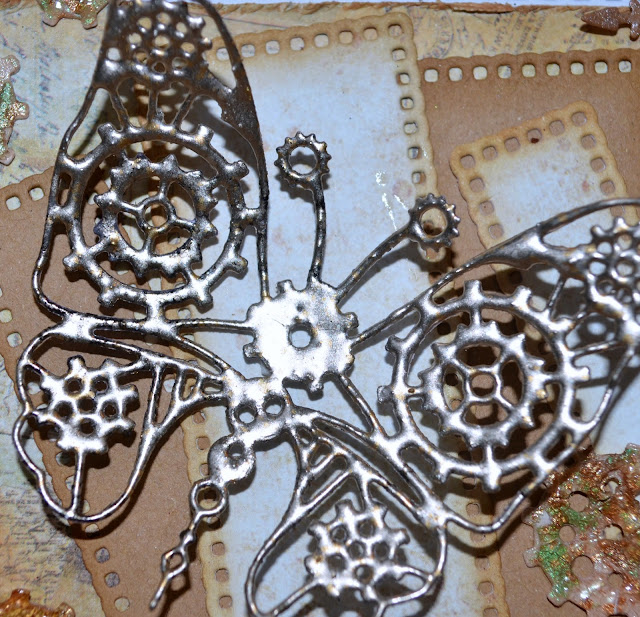
Hello, I'm back with a steampunk inspired created with Cheery Lynn Designs dies.  Everything is layered on a 5.5" kraft card base.  I added a white layer that I distressed the edges of and cut with the Square Stitch Nesting  die.  I topped the white layer with a piece of patterned card stock. I aged this with a distressing tool and colored the edges with distress ink.  


I used glued two sizes of Pierced Banners and randomly layered them before adding the fun elements.  This Gears Butterfly was embossed with frantage powder for an uneven but metallic appearance and then popped up using foam tape.


The Gears were coated with clear crackle paint and perfect pearls.  The Steampunk Corner die cuts were colored with a metallic distress stain.  Before gluing all the gears in place I cut the larger Celebrate die cut, colored it with distress ink and glued it to the card.

Cheery Lynn Dies

Thanks for visiting and make sure to join in the fun at the In Stitches Challenge this week for a chance to win $20 towards shopping at Cheery Lynn Designs.

Wednesday, July 8, 2015

Classy Cards Watercolor Butterflies

Hello!  I'm back today sharing a card for this week's Splatters Challenge at the Classy Cards 'n Such Blog.  Splatters immediately made me think of my new Color Bursts.  This was my first time using them and they were so much fun!  


I first took an A2 sized card front and spritzed it was water making sure to cover the entire paper.  Then I sprinkled Alizarian Crimson, Lemon Yellow and Violet Color Bursts randomly onto the wet paper.  The colors blended and I sprayed a little more water in spots where I wanted more of a mix.  


Then after drying the paper with a heat tool I cut it using the Memory Box Floating Butterfly Frame die.  I glued this to an A2 white card (making sure to glue the butterfly centers but not the sides for added dimension).  I added sparkle with a clear Wink of Stella Pen. Then I then glued clear rhinestones from my stash onto all the butterfly bodies.

Thanks for visiting and I can't wait to see your Splatter creations this week!  Come link up and join the fun.  Hugs, Jenny

Classy Cards Supplies

Sunday, July 5, 2015

Classy Cards Rose Red


Hi, I'm sharing a card that I made for Classy Cards 'n Such using the Heartfelt Creations Botanical Wings die. I started by stamping the Heartfelt Creations Botanical Rose Stamps and then cut them with the matching Botanical Wings die.  I sprayed the flowers with water and scrunched them up.  I also used a stylus from the Paper Blossoms Tool Kit to help shape while gluing the flower layers together.

I used spray stain and glimmer mists to color the roses and while they were drying I assembled the rest.  The A2 card has a layer of Kraft Card Stock and then a layer of Graphic 45 Botanical Tea. I cut and colored the frilly Joy! Crafts Circle using distress ink and a mini ink blending tool.  Then stamped the JustRite Floral Vintage Labels 2 sentiment on a Spellbinders circle from my stash.  The circle was popped up higher using Joy Foam Pads to adhere it to the card.

I added the black centers (from a die in my stash) and pearls to the flowers and arranged them around the circle.  After gluing them down I added foliage from the Memory Box Fresh Foliage die.

Thanks for looking!

 Classy Cards 'n Such Supplies
Spellbinders Circle

Thursday, July 2, 2015

Cheery Lynn Fairy Tale


Hi this is my card I'm sharing on the Cheery Lynn Designs Blog today.  I created this card for a workshop I did with my eight year old daughter and her friends.  I demonstrated basic flower making and used design paper that I thought would appeal to them.


First I cut the floral design paper using the A2 Frames Rectangular Scalloped Set.  I used the Ankara Lace Doily as a backdrop for my stamped sentiment.  I then popped the doily up with adhesive foam before beginning my flowers.


I liked how my Judy's Blooms flowers came out when I scrunched the edges and accordion folded them in my post last week so I made another to show the girls.  It has a light blue center colored with distress ink and I added a sparkly flat-backed rhinestone.  The pink flowers were made using the Chrysanthemum Strip die.  I blended distress ink colors on the edges and molded the flowers with a stylus so they would cup inward.  The centers are dewdrops.

Cheery Lynn Dies

Thanks for visiting and I hope you can join the Christmas in July Challenge this week for a chance to win a $20 gift certificate to Cheery Lynn Designs!

Wednesday, July 1, 2015

Classy Cards Places You'll Go

Hello!  I'm back again today with a card inspired by the new Classy Cards 'n Such Purple Ride Challenge.  I loved the purple bicycle inspiration photo this week and once I found this stamp in my supplies this card just flew together. Don't forget to use my coupon code Jenny-10 to save 10% off your entire purchase at the Classy Cards Store.


I made the bicycle using purple paper and my Memory Box Brand New Bicycle die.  The wheels were cut with white card stock, colored with copics and paper pieced on top of the die cut.  I colored the handlebars and seat with a black copic marker.  

The rest of this card was simple.  I found purple design paper in my stash and cut a center with a Spellbinders Oval die.  I then cut a frame in white with a smaller oval.  The base is a light blue A2 card.  I wanted to use blue so the background would look like a clear sky.

I stamped my Dr. Seuss quote with Black Memento Ink and then adhered the white and purple frame on top using Joy Foam Pads for dimension.  The Poppystamps Weeping Willow Branches were glued on top and the bicycle was also adhered with Joy Foam Pads.  There's more dimension than appears in the photo.  The willow branches were cut twice.  I don't think it's visible but I actually cut a couple of long branches and glued them on the right side of the card to get long branches on that side too.

Classy Cards Supplies

Thanks for visiting and don't forget to link up a card to our new challenge this week for a chance to win a great prize!

Challenge Entered
Poppystamps A Day in the Park

Scrapyland Butterfly Flight

Hi, I'm so excited to be sharing my first guest DT card for the new Anything Goes Challenge at the Scrapyland Blog.  I hope you'll play along for a chance to win a gift certificate to the Scrapyland store!  

Scrapyland Dies

This card was pretty simple to create and it makes much more of an impression in person.  It sparkles!  I used an A2 card as a base, cut a blue mat 1/4 of an inch smaller and then a white mat 1/4 of an inch smaller than the blue.  I then cut the white top card stock with three Memory Box butterfly dies. After coloring the butterflies yellow and brushing them with a glitter pen I glued the centers back into the negative space.  I added yellow rhinestone bodies and added the teal bow to finish it off.

Thanks for visiting and make sure to join in the challenge this week at Scrapyland!

Dies R Us Celebrate

Good Morning!  I'm posting today with an inspiration card for the new Stars & Stripes Challenge going on at Dies R Us.  Come and join the fun and link up a new project for a chance to win a gift certificate to the Dies R Us store!


For this card I used an A2 card base, then added a blue mat, then a red one and then used the Frantic Stamper Star Card Panel on top.  I cut the star card panel a second time and paper pieced in some of the blue stars.

I added three Cheery Lynn Cutie Fringe #4's that I rolled with a quilling tool.  The blue Celebrate word is from Frantic Stamper's Stars and Stripes Photo Card Die.

Thanks for looking and I can't wait to see your stars and stripes cards!