

Hello! Since the current challenge theme at Cheery Lynn Designs is Anything Goes I thought I'd make something different than a card. This is a picture frame made out of chipboard. I've never created anything like this before so I took lots of photos along the way.
First I cut three pieces of thin chipboard to 5.5" square. I cut the middle out of two of the three pieces using two different sizes of the Scalloped Square Stackers. The two pieces with square windows will be used to double mat the central image and the whole square is for the back of the frame.

I painted the frame with the larger square opening with a clear matte gesso. When the gesso was dry I glued elements from the new Quadrafoil Accents die set (also cut out of chipboard) on top and then painted the entire frame with a metallic distress paint. I wasn't worried about the paint being even because I planned to cover it.

I sponged black distress ink on top because I wanted contrast and an antique feel. The crackle paste I used suggested a black color base. There was still a metallic sheen to the frame.

I covered the frame with white Crackle paste, leaving less on the raised Quadrafoil Accents so they'd show up more. I didn't worry about neatness. Variations makes the crackle interesting when dry.

My heat tool unfortunately went on strike so while I was waiting I added clear crackle glaze to the edges of the flowers. The large flower was created using the Stacker Flower 5 die. The smaller roses are from the Tea Rose Medium die. They were colored with distress ink and sprayed with shimmery mists.

Once the crackle glaze was dry and I moved around the flowers a bit to determine placement.

The sentiment paired well with the vibrant flowers but everything felt too bright so I added brown distress ink to the frame and flowers.

The second piece of chipboard with the smaller window was colored with bronze metallic paint. I sandwiched a piece of clear acetate from toy packaging between the two chipboard mats before gluing the chipboard together.

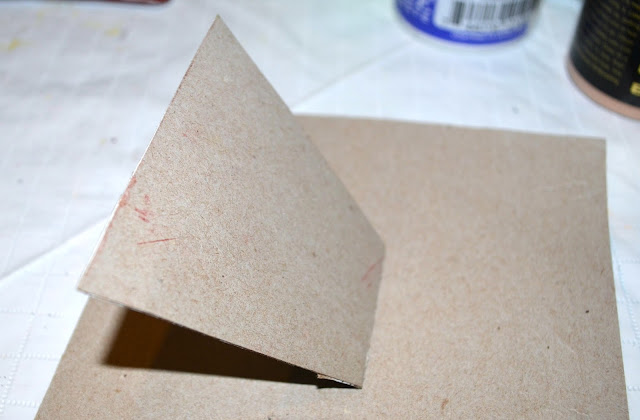
I added a stand to the third piece of chipboard so the frame can stand independently. The chipboard was thin so I cut and glued two pieces together to create the stand and scored and folded the top.
 Brads connect the stand to the frame. I punched two small holes through the top part of the stand as well as through the back of the frame and then threaded two brads through the holes.
Last in the assembly, I glued the front of the frame to the back. If you want to be able to use the frame with different images, make sure to only glue around the bottom and sides, leaving the top unglued. Heavy books held the chipboard together while it dried.


Last in the assembly, I glued the front of the frame to the back. If you want to be able to use the frame with different images, make sure to only glue around the bottom and sides, leaving the top unglued. Heavy books held the chipboard together while it dried.

The Fern Leaves were coated with a sepia gloss and I adhered the flowers and leaves to the frame with the same glaze.

Cheery Lynn Dies
Fern Leaf B666 (New)
Quadrafoil Accents B687 (New)
Thanks for visiting and make sure to join us for the Anything Goes challenge that ends on February 3rd. Our challenge rules have changed, beginning February 4th you'll have two weeks to enter and can enter up to two projects for a chance to win a $20 gift card to the Cheery Lynn Store.
Challenge Entered:
Crafting by Designs Add a Flower
4 Crafty Chicks Anything but a card
Aud Sentiments Anything Goes
Simply Create Too Something New
4 Crafty Chicks Anything but a card
Aud Sentiments Anything Goes
Simply Create Too Something New
3 comments:
Fabulous project and tutorial. You have added so many beautiful embellishments .Thank you for joining us at Aud Sentiments challenge good luck Ginny ♥
Aud Sentiments
My Blog As I do Rodos
This is just beautiful!!! I love the easy to understand tutorial and those flowers are just stunning!!! Thanks for joining us at 4 Crafty Chicks this week.
Tina- 4CC DT
A lovely tutorial and a great ptoject. Thanks for joining Aud Sentiments challenge. Elaine
Post a Comment